- Cuckoo Stud
-
Orpingtons '101'
- Orpington Club Membership
- Orpington Type and Main Colours
- Non APS colours - new and pre-existing but not approved Orpington colours
- Blue Cuckoo Colour Standard
- Lavender & Lav Cuckoo Colour Standard
- Buff Cuckoo Colour Standard
- Red Barred (Cuckoo) Colour Standard
- Chocolate Orpington colour Standard
- BREEDING SPLASH to carry the silver gene >
- Buff Orpington improving Type
- White Orpington improving Type
-
About us
- the Stud colours/breeds
- NEWS and UPDATES
- Breeding Cuckoo Orpingtons >
- Cuckoo and Black original lines
- Blue Cuckoo Orpington development
- Buff Cuckoo Orpington development
- Crele, Partridge and Gold Barred Buff Orpington development
- New Colours, acceptance of the colours
- Lavender and Lavender Cuckoo Orpingtons in the backyard
- the Chocolate Orpington >
- Cuckoo Double Bar and Single Bar factor
- the Blue Gene - theory of Mendel's Law
- Blue Cuckoo and Mendel's Law
- Developing multiple related lines
- Orpingtons - larrikin mateship = our first birds
- Our Cuckoo Silkies
-
Gallery
- Show results
- Lavender & Lavender Cuckoo Orpington, bantam and large >
- Crele, Partridge Orpington
- Blue Cuckoo Orpington AORC, large >
- Buff Cuckoo Orpington, large >
- Cuckoo Orpington, bantam
- Black Orpington large
- Splash Orpington, large >
- Choc, Choc Cuckoo & Mauve Orpington large
- Choc Crele, Choc Partridge and Choc Birchen large size
- Black Orpington, bantam
- Gold Barred Buff Orpington
- Phoenix
- Silkie
- For Sale
- Contact us
- Acquiring and caring for your Orpingtons
- Feeding - what we feed our birds
- Heat waves, hot days, Summer and Liquefaction
- Artificial UV lighting
- Chook Saddles
- Fertility and my secret recipe
- Posted chickens - how to make them
- Embryonic developmental stages of a chick
- Mareks Disease
- Hatching larger std size birds
- Size = breeding down
- Brooder - recycled and effective
- Growth patterns and assessing birds
- Microchipping your birds
- Secure housing
- Lime - Hydrated and Garden (AG) Lime and their uses in the chook pen
- MOUSE/RAT TRAP chook friendly
- Appraisal pictures of your birds
- Showing - training your birds
- Coccidia Oocyst cycle and treating Coccidiosis with Baycox
- Lymphoid Leukosis – Avian (The Wasting Disease)
- Coryza Avibacterium Paragallinarum
- Crop problems in poultry
- Mosquito control
- Maremma - training a pup
- Fox Traps
- Snake Bite
The microchips referred to on this page are German manufactured, ISO compatible and are registered with Australasian Animal Registry, Petsafe, National Pet Register and Central Animal Records.
Micro-chipping your birds
For many reasons breeders are starting to microchip their birds
At The Stud birds have been chipped since the early 1970s, mainly as a means to easily identify each bird and trace its genealogy using the chip number against records kept.
In more recent times micro-chipping has become a tool in the deterrent of theft, which is sadly on the increase in all countries.
To Microchip =
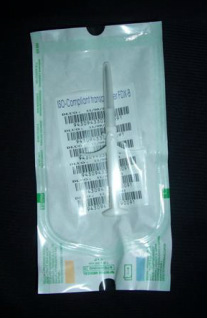
1. Scan the injector / applicator, and confirm the number on the chip is the same as the sticky tags supplied with it – 6 tags come with each injector
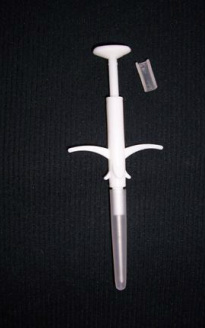
2. Carefully open the pack the injector is in and snap off the safety ring from the top of the handle
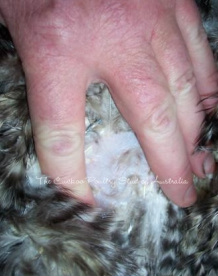
3. Lay the bird on its side, on your lap. Separate the feather on the breast area to find a large enough area of clear skin. Making sure you can see the blood vessels so as to avoid puncturing them. Wipe the area with an alcoholic wipe / antiseptic.
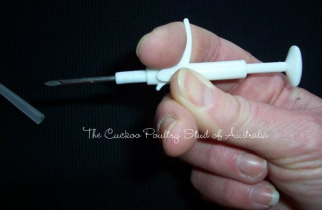
4. Remove the syringe cover, and then, with the open wedge side of the injector facing UP and ONLY applying pressure on the handles (so as to not release the chip early)
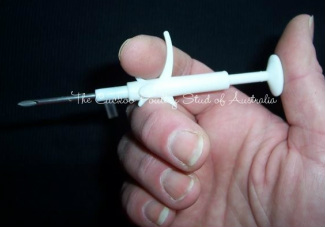
5. Carefully push through the skin at an angle so that the injector slides under the skin into the breast meat, but does not damage any blood vessels or make contact with any bones.
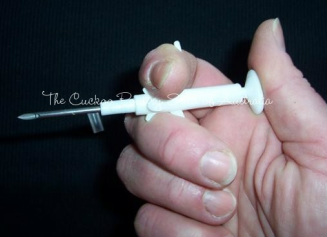
6. When the injector needle component is approximately 1/3 to 1/2 way in PUSH the plunger down to insert the chip
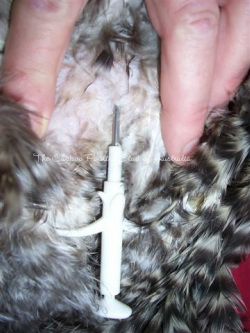
7. Remove the injector and press a tissue lightly on the injection site for a few seconds until the skin closes back over. Then scan to ensure the chip is in place. Allow the bird to rest for a few minutes, then place it into a clean pen to help avoid contamination of the injection site.
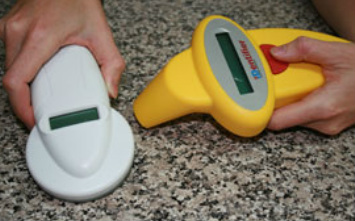
Scanners - The Stud uses the white one as it has a larger scan area
Australian Supplier details :-
Micro Chips 'n' Bits
website = www.microchipsnbits.com
email = [email protected]
Micro Chips 'n' Bits is able to supply Scanners as well as the implant units in lots of 10 up to as many as required.
# for non Australian readers, please contact your countries supplier for details as to availability and cost.
# subject to copyright laws of Australia
